배열(Array)이란?
- 동일한 자료형을 하나의 묶음으로 저장하는 자료구조
- 배열을 구성하는 각각의 값을 배열 요소(element)라고 하며, 배열에서의 위치를 가리키는 숫자를 인덱스(index)

배열 선언 & 초기화
- 배열을 선언할 때는 미리 공간의 갯수(길이)를 지정해야 하는데, 이는 가변적인 길이이 아니라 고정적인 길이를 가진다는 것을 의미
- 또한 동일한 자료형을 저장하기 때문에 배열의 타입(int, String, 객체 등)을 지정
- 배열의 시작 위치(index)는 0부터 시작하기 때문에 길이가 5라면, 0~4까지의 인덱스를 가지며 0~4를 벗어나게 되면 배열에서 가장 많이 접하는 에러인 ArrayIndexOutOfBoundsException 발생
public static void main(String[] args) {
    // 배열의 선언
    int[] arr1 = new int[5];
    // 값의 초기화
    arr1[0] = 10;
    arr1[1] = 20;
    arr1[2] = 30;
    arr1[3] = 40;
    arr1[4] = 50;

    // 배열의 선언 & 초기화
    int[] arr2 = new int[]{100, 200, 300, 400, 500};
    int[] arr3 = {1000, 2000, 3000, 4000, 5000};
}
배열의 출력
- 배열 안의 값을 확인하고 싶을 때 System.out.println()을 사용하여 배열 변수를 출력하게 되면 의도하지 않은 이상한 값이 출력 됨
- 이 값은 메모리에 있는 배열의 주솟값(타입@주소)를 가리키는 것인데, 배열의 값을 출력하기 위해서는 변수[인덱스]를 일일히 하드 코딩 하거나, 반복문을 이용하여 출력을 해야 함
- 하지만 자바에서는 이런 번거로움을 줄이기 위해 java.util 패키지 안에 Arrays.toString()이라는 메서드를 제공하여 간단히 출력 가능
public static void main(String[] args) {
    // 배열의 선언
    int[] arr1 = new int[5];
    // 값의 초기화
    arr1[0] = 10;
    arr1[1] = 20;
    arr1[2] = 30;
    arr1[3] = 40;
    arr1[4] = 50;

    // 배열의 선언 & 초기화
    int[] arr2 = new int[]{100, 200, 300, 400, 500};
    int[] arr3 = {1000, 2000, 3000, 4000, 5000};

    System.out.println(arr1); // [I@4eec7777

    System.out.println(arr1[0]); // 10
    System.out.println(arr1[1]); // 20
    System.out.println(arr1[2]); // 30
    System.out.println(arr1[3]); // 40
    System.out.println(arr1[4]); // 50

    for(int i = 0; i < arr2.length; i++){
        System.out.println(arr2[i]); // 100, 200, 300, 400, 500
    }

    System.out.println(Arrays.toString(arr3)); // [1000, 2000, 3000, 4000, 5000]
}
배열의 복사
- 앞서 배열은 고정된 크기의 자료구조라고 하였고, 배열의 길이를 벗어나게 되면 ArrayIndexOutOfBoundsException이라는 에러가 발생한다고 설명
- 즉, 배열은 한 번 선언되고 나면 길이를 늘릴 수 없기 때문에 더 큰 크기의 배열이 필요하다면 다음과 같은 작업이 필요
- 더 큰 길이의 배열을 선언
- 기존의 배열을 새로운 배열에 복사
- 다만, 위와 같은 작업은 많이 비용(Cost)이 발생
비용(Cost)이 많이 들어가는 이유?
컴퓨터는 워낙 빠르기 때문에 크기가 작은 배열이라면 크게 눈에 띄지 않지만, 만약 길이가 1000만인 배열이 꽉 차서 2배의 크기인 2000만의 배열을 선언한다고 가정
그렇다면 2000만의 메모리 공간을 확보해야하고, 기존 배열의 1000만개 데이터를 복사하는 과정에서 많은 비용이 소모가 됨
또한, 배열의 복사가 되었더라도 새로 확보된 1000만개의 공간을 언제 다 활용할 지 알 수 없기 때문에 메모리의 낭비가 될 수 있어 고정적인 크기가 아니라 얼마가 될지 모른다면 ArrayList 같이 동적 크기 조절이 가능한 자료구조를 활용하는 것이 효율적일 수 있음
- 배열의 복사 방법
- 반복문 사용
- System.arraycopy()
- Arrays.copyOf()
- Arrays.copyOf는 System.arraycopy를 래핑한 함수로 둘이 동일하다고 할 수 있음
- 다만, Arrays.copyOf 가 좀더 직관적이라 이쪽이 더 많이 사용되는 편이라고 함
public static void main(String[] args) {
    int[] arr1 = {10, 20, 30, 40, 50};
    int[] arr2 = new int[arr1.length * 2];

    for(int i = 0; i  < arr1.length; i++){
        arr2[i] = arr1[i];
    }

    System.out.println(Arrays.toString(arr1)); // [10, 20, 30, 40, 50]
    System.out.println(Arrays.toString(arr2)); // [10, 20, 30, 40, 50, 0, 0, 0, 0, 0]
}
public static void main(String[] args) {
int[] arr1 = {10, 20, 30, 40, 50};
int[] arr2 = new int[arr1.length * 2];
System.arraycopy(arr1, 0, arr2, 0, arr1.length);
/*
첫번째 인자 : 복사할 배열
두번째 인자 : 복사를 시작할 배열의 위치
세번째 인자 : 붙여넣을 배열
네번째 인자 : 복사할 배열값들이 붙여질 시작 위치
다섯번째 인자 : 지정된 길이만큼 복사
*/
System.out.println(Arrays.toString(arr1)); // [10, 20, 30, 40, 50]
System.out.println(Arrays.toString(arr2)); // [10, 20, 30, 40, 50, 0, 0, 0, 0, 0]
}public static void main(String[] args) {
int[] arr1 = {10, 20, 30, 40, 50};
int[] arr2;
int[] arr3 = new int[arr1.length * 2];
// Arrays.copyOf(복사할 배열, 길이)
arr2 = Arrays.copyOf(arr1, arr1.length * 2);
System.out.println(Arrays.toString(arr2)); // [10, 20, 30, 40, 50, 0, 0, 0, 0, 0]
// Arrays.copyOfRange(복사할 배열, 시작 인덱스, 끝 인덱스) -> 시작 ~ 끝 - 1까지 복사
arr3 = Arrays.copyOfRange(arr1, 1, 3);
System.out.println(Arrays.toString(arr3)); // [20, 30]
// 3 ~ 9번까지 복사되어 크기가 7인 배열 생성
// arr1을 넘는 인덱슨느 0으로 초기화
arr3 = Arrays.copyOfRange(arr1, 3, 10);
System.out.println(Arrays.toString(arr3)); // [40, 50, 0, 0, 0, 0, 0]
}배열의 정렬
- 배열의 정렬은 Arrays.sort() 메서드를 이용해 정렬 가능
- 이 때 정렬된 배열은 새로운 배열이 아닌, 자기 자신을 정렬
public static void main(String[] args) {
    Integer[] arr = {43, 21, 7, 0, 91};

    // 오름차순 정렬
    Arrays.sort(arr);
    System.out.println(Arrays.toString(arr)); // [0, 7, 21, 43, 91]

    // 내림차순 정렬
    Arrays.sort(arr, Collections.reverseOrder()); // 배열을 내림차순으로 정렬할 때는 Collections 클래스의 reverseOrder() 함수를 사용
    System.out.println(Arrays.toString(arr)); // [91, 43, 21, 7, 0]

    // 배열 일부부만 정렬
    int[] arr1 = {43, 21, 7, 0, 91};
    Arrays.sort(arr1, 0, 3); // 배열 요소 0, 1, 2 만 정렬
    System.out.println(Arrays.toString(arr1)); // [7, 21, 43, 0, 91]
}- Arrays.sort()에서 내림차순 정렬을 하기 위해서는 Collections.reverseOrder()라는 메서드를 사용해야하는데, 이 때 Collections.reverseOrder()는 제너릭 메서드로 객체(Object)를 인수로 받아 기본형(primitive type)인 int[] 배열은 사용 불가
- 따라서, int[] 배열을 내림차순 정렬하기 위해서는 다음과 같은 과정을 거쳐야 함
- int[] → Integer[]로 박싱(boxing)
- Integer[] 배열을 내림차순 정렬
- Integer[] 배열 → int[] 배열로 언박싱(unboxing)
public static void main(String[] args) {
    int[] intArr = {43, 21, 7, 0, 91};

    // int[] -> Integer[] Boxing
    Integer[] integerArr = Arrays.stream(intArr).boxed().toArray(Integer[]::new);
    System.out.println(Arrays.toString(integerArr)); // [43, 21, 7, 0, 91]

    // 내림차순 정렬
    Arrays.sort(integerArr, Collections.reverseOrder());
    System.out.println(Arrays.toString(integerArr)); // [91, 43, 21, 7, 0]

    // Integer[] -> int[] Unboxing
    intArr = Arrays.stream(integerArr).mapToInt(Integer::intValue).toArray();
    System.out.println(Arrays.toString(intArr)); // [91, 43, 21, 7, 0]
}
배열의 비교
- 두 개의 배열의 구성(원소)가 같은지 비교하기 위해 for문으로 순회하여 원소를 비교할 수도 있지만, 이 또한 Arrays.equals() 메서드를 제공
public static void main(String[] args) {
    String[] str1 = { "Java", "Spring", "Spring Boot", "MSA", "RESTful API" };
    String[] str2 = { "Java", "Spring", "Spring Boot", "MSA", "RESTful API" };
    String[] str3 = { "Java", "Spring", "Spring Boot", "MSA"};
    String[] str4 = { "java", "spring", "spring Boot", "MSA", "RESTful API" };

    System.out.println(StringEqual(str1, str2)); // true
    System.out.println(StringEqual(str1, str3)); // false
    System.out.println(StringEqual(str1, str4)); // false

    System.out.println(Arrays.equals(str1, str2)); // true
    System.out.println(Arrays.equals(str1, str3)); // false
    System.out.println(Arrays.equals(str1, str4)); // false
}

private static boolean StringEqual(String[] str1, String[] str2) {
    if(str1.length != str2.length) return false;
    for(int i = 0; i < str1.length; i++){
        if(!str1[i].equals(str2[i]))
            return false;
    }
    return true;
}
객체 배열
- 기본 자료형(int, long 등) 뿐만 아니라 객체 또한 배열로 사용 가능
- 객체 또한 동일한 자료형으로 취급되기 때문
public static class testObject{
    int id;
    String description;

    testObject(int id, String description){
        this.id = id;
        this.description = description;
    }

    @Override
    public String toString(){
        return "< id = " + id + ", description = " + description + " >";
    }
}
public static void main(String[] args) {
    // 객체 배열 선언
    testObject[] testObjects1 = new testObject[3];

    // 객체 배열 초기화
    testObjects1[0] = new testObject(101, "first");
    testObjects1[1] = new testObject(102, "second");
    testObjects1[2] = new testObject(103, "third");

    System.out.println(Arrays.toString(testObjects1)); // [< id = 101, description = first >, < id = 102, description = second >, < id = 103, description = third >]

    // 객체 배열 선언 & 초기화
    testObject[] testObjects2 = {
            new testObject(104, "fourth"),
            new testObject(105, "fifth"),
            new testObject(106, "sixth")
    };

    System.out.println(Arrays.toString(testObjects2)); // [< id = 104, description = fourth >, < id = 105, description = fifth >, < id = 106, description = sixth >]
}
객체 배열 복사
- 객체 배열 또한 앞에서 예제로 든 기본 타입(primitive type)인 int 배열처럼 Arrays.copyOf 또는 Arrays.copyOfRange 메서드를 통해 간단히 복사 가능
- 하지만, 객체 배열의 경우 매우 주의해야할 사항이 있는데 Arrays.copyOf 메서드를 사용하여 복사한 객체 배열은 얕은 복사가 되었기 때문에 원본 객체의 값 또는 복사한 객체 배열의 값들을 변경하게 되면 서로 영향을 미치게 됨
- 이것이 어떤 의미인지는 아래 코드의 예시를 통해 확인하도록 함
public static class testObject{
    int id;
    String description;

    testObject(int id, String description){
        this.id = id;
        this.description = description;
    }

    @Override
    public String toString(){
        return "< id = " + id + ", description = " + description + " >";
    }
}
public static void main(String[] args) {
    testObject[] testObjects1 = {
            new testObject(101, "first"),
            new testObject(102, "second"),
            new testObject(103, "third")
    };

    testObject[] testObjects2 = Arrays.copyOf(testObjects1, testObjects1.length);
    System.out.println(Arrays.toString(testObjects1)); // [< id = 101, description = first >, < id = 102, description = second >, < id = 103, description = third >]
    System.out.println(Arrays.toString(testObjects2)); // [< id = 101, description = first >, < id = 102, description = second >, < id = 103, description = third >]

    // 원본 객체 배열의 값 변경
    testObjects1[0].id = 0;
    testObjects1[0].description = "delete";

    System.out.println(Arrays.toString(testObjects1)); // [< id = 0, description = delete >, < id = 102, description = second >, < id = 103, description = third >]
    System.out.println(Arrays.toString(testObjects2)); // [< id = 0, description = delete >, < id = 102, description = second >, < id = 103, description = third >]

    // 복사한 객체 배열의 값 변경
    testObjects2[1].id = 300;
    testObjects2[1].description = "modify";

    System.out.println(Arrays.toString(testObjects1)); // [< id = 0, description = delete >, < id = 300, description = modify >, < id = 103, description = third >]
    System.out.println(Arrays.toString(testObjects2)); // [< id = 0, description = delete >, < id = 300, description = modify >, < id = 103, description = third >]
}
얕은 복사와 깊은 복사
얕은 복사와 깊은 복사에 대한 개념을 잘 이해하고 있어야 원본의 값이 손실되는 불상사를 막을 수 있음
객체 배열의 값(객체)들은 실제 값이 아닌 힙 메모리에 있는 객체를 가르키는 참조값(주소값)을 저장
얕은 복사는 원본 객체 배열과 복사된 객체 배열은 같은 객체를 참조하기 때문에, 원본이든 복사본이든 어느 한쪽을 변경하게 되면 다른 쪽도 영향을 받게 됨
따라서, 원본의 값은 그대로 유지하면서 새로 복사한 값만 변경을 하고 싶다면 깊은 복사를 해야하고, 깊은 복사는 객체를 새로 생성하여 참조하기 때문에 원본과 복사한 것이 서로 다른 객체를 참조하게 됨
public static class testObject{
    int id;
    String description;

    testObject(int id, String description){
        this.id = id;
        this.description = description;
    }

    @Override
    public String toString(){
        return "< id = " + id + ", description = " + description + " >";
    }
}
public static void main(String[] args) {
    testObject[] testObjects1 = {
            new testObject(101, "first"),
            new testObject(102, "second"),
            new testObject(103, "third")
    };

    testObject[] testObjects2 = new testObject[testObjects1.length];
    for(int i = 0; i < testObjects1.length; i++){
        testObjects2[i] = new testObject(testObjects1[i].id, testObjects1[i].description);
    }

    System.out.println(Arrays.toString(testObjects1)); // [< id = 101, description = first >, < id = 102, description = second >, < id = 103, description = third >]
    System.out.println(Arrays.toString(testObjects2)); // [< id = 101, description = first >, < id = 102, description = second >, < id = 103, description = third >]

    testObjects1[0].id = 0;
    testObjects1[0].description = "delete";
    System.out.println(Arrays.toString(testObjects1)); // [< id = 0, description = delete >, < id = 102, description = second >, < id = 103, description = third >]
    System.out.println(Arrays.toString(testObjects2)); // [< id = 101, description = first >, < id = 102, description = second >, < id = 103, description = third >]

    testObjects2[1].id = 300;
    testObjects2[1].description = "modify";
    System.out.println(Arrays.toString(testObjects1)); // [< id = 0, description = delete >, < id = 102, description = second >, < id = 103, description = third >]
    System.out.println(Arrays.toString(testObjects2)); // [< id = 101, description = first >, < id = 300, description = modify >, < id = 103, description = third >]
}
객체 배열의 정렬
- int 배열의 경우 단순히 숫자로 정렬하면 됐지만, 객체의 경우 여러 멤버 변수를 가지기 때문에 '어떤 기준'을 가지고 정렬을 할 것인지 정의가 필요
- 예를들어 User라는 객체에 이름과 나이를 변수로 가진다면, 이름 순으로 정렬할 것인지 나이 순으로 정렬할 것인지가 필요하다는 의미
- 객체 배열을 정렬하기 위해서는 Comparable과 Comparator 인터페이스를 이용하여 위에서 말한 기준으로 정렬이 될 수 있도록 코딩해주어야 함
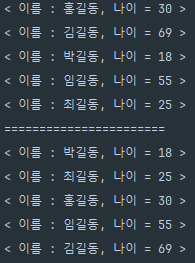
Comparable 인터페이스 사용
- Comparable 인터페이스는 객체 자체에 자연 정렬 기준을 정의하는 방식으로, 하나의 정렬 기준만 가질 수 있음
- Comparable 인터페이스를 상속받아 compareTo() 메서드를 오버라이딩하여 사용
public static class User implements Comparable<User>{
    String name;
    int age;

    User(String name, int age){
        this.name = name;
        this.age = age;
    }

    @Override
    public String toString(){
        return "< 이름 : " + name + ", 나이 = " + age + " >";
    }

    @Override
    public int compareTo(User u) {
        return this.age - u.age;
    }
}
public static void main(String[] args) {
    User[] user = {
            new User("홍길동", 30),
            new User("김길동", 69),
            new User("박길동", 18),
            new User("임길동", 55),
            new User("최길동", 25)
    };

    for(User u : user) {
        System.out.println(u);
    }
    System.out.println("=======================");
    Arrays.sort(user);
    for(User u : user) {
        System.out.println(u);
    }
}
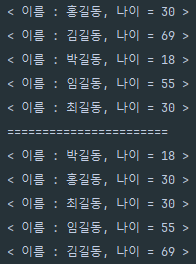
Comparator 인터페이스 사용
- Comparator 인터페이스는 외부에서 정렬 기준을 지정할 수 있어, 동일한 클래스에 대해 여러 가지 정렬 기준을 적용하고자 할 때 유용
- compare() 메서드를 오버라이딩하여 사용
public static class User {
    String name;
    int age;

    User(){}
    User(String name, int age){
        this.name = name;
        this.age = age;
    }

    @Override
    public String toString(){
        return "< 이름 : " + name + ", 나이 = " + age + " >";
    }
}
public static void main(String[] args) {
    User[] user = {
            new User("홍길동", 30),
            new User("김길동", 69),
            new User("박길동", 18),
            new User("임길동", 55),
            new User("최길동", 30)
    };

    for(User u : user) {
        System.out.println(u);
    }
    System.out.println("=======================");
    Arrays.sort(user, new Comparator<User>() {
        @Override
        public int compare(User o1, User o2) {
            return Integer.compare(o1.age, o2.age);
        }
    });
    for(User u : user) {
        System.out.println(u);
    }
}
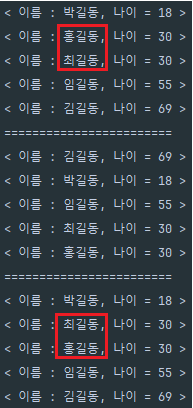
여러 조건 비교(comparing / thenComparing)
- 나이순으로 정렬했을 때 나이가 같을 경우 이름순으로 정렬해줘야하는 상황이 발생할 수 있음
- 객체의 여러 속성을 정렬하기 위해 comparing()과 thenComparing()을 이용해 체이닝하여 구현 가능
- 이 때 객체의 속성을 가져올 때는 getter를 사용해야 함
public static class User {
    String name;
    int age;

    User(){}
    User(String name, int age){
        this.name = name;
        this.age = age;
    }

    public String getName() {
        return name;
    }

    public int getAge() {
        return age;
    }

    @Override
    public String toString(){
        return "< 이름 : " + name + ", 나이 = " + age + " >";
    }
}
public static void main(String[] args) {
    User[] user = {
            new User("홍길동", 30),
            new User("김길동", 69),
            new User("박길동", 18),
            new User("임길동", 55),
            new User("최길동", 30)
    };

    Arrays.sort(user, Comparator.comparing(User::getAge));
    for(User u : user) System.out.println(u);
    System.out.println("========================");

    Arrays.sort(user, Comparator.comparing(User::getName));
    for(User u : user) System.out.println(u);
    System.out.println("========================");

    Arrays.sort(user, Comparator.comparing(User::getAge).thenComparing(User::getName));
    for(User u : user) System.out.println(u);
}
'Computer Science' 카테고리의 다른 글
| [알고리즘] 자주 사용하는 정렬 (0) | 2024.11.05 |
|---|---|
| [자료구조] 해시맵 개념과 해시 충돌 (0) | 2024.11.04 |
| [자료구조] 이진트리와 이진탐색트리 (0) | 2024.11.02 |
| [자료구조] Queue 개념 (0) | 2024.11.02 |
| [자료구조] Stack 개념 (0) | 2024.11.01 |


